Saturday, 23 February 2013

All Purpose Cleaner

This homemade Cleaner is fantastic! I use it in my tub, sinks and toilets. I have even used it to get tough stains off of my counters and kitchen table. You can practically use it anywhere. It takes minutes to make and one batch lasts me about 3 weeks. Stick to making small batches as the paste will dry out after a few weeks.

What you'll Need:

3/4 cup baking soda
1/4 cup castile soap (you can find this at most health food stores and in the organic sections of many large grocery stores)
1 tbsp. water
1 tbsp. vinegar


Make it:

 1. Mix the baking soda and castile soap.
 2. Add the water and stir with a fork.
 3. Add the vinegar and mix.
Store in a container with a tight lid. If you go to use it and it had dried out...simply add some water and mix it up.

Friday, 22 February 2013

Chia Seed Pudding

Cha cha cha chia. Sorry I couldn't help myself. Yes, today I made pudding out of chia seeds. Who knew they not only make growable pets, but they are good for you too!

I am feeling nostalgic today so check out this Chia Pet video.

Okay, back on topic. Did you know Chia seeds contain,
  • 15 x more magnesium than broccoli
  • 7 x more vitamin C than oranges
  • 6 x more calcium than milk
  • 3 x more antioxidants than blueberries
  • 3 x more iron than spinach
WOW!

Time to make some pudding.


What You'll Need

3/4 cup of chia seeds (you can buy these almost anywhere now - bulk barn, grocery stores)
2 cups of almond milk (to make your own, check out my homemade almond milk recipe)
1 tsp vanilla
1/2 cup unsweetened coconut, finely shredded
1 Tbsp honey

Make It

Just dump all ingredients in a bowl, mix it up and let it set for a few minutes. It's that easy. The chia seeds absorb the liquids and they become almost jelly-like. Within minutes, it will be ready for you to gobble up.

Eat right away or place the pudding in the fridge for later.


Saturday, 16 February 2013

Bagels

I have recently re-kindled my love for fresh homemade bread. My poor bread maker had spent roughly a year in my basement, but in the last few weeks has made my family 4 different loaves.

As my house was filling with the smell of baking bread last week, I began to think about the other types of carbs my family enjoys. Bagels are definitely up there on the priority list, though it had never crossed my mind to make my own...until now.

Besides the fabulous smell of bread baking in your oven and the chewy texture of this recipe, I was completely surprised as to how easy bagels from scratch were.

What You'll Need

4 cups bread flour
1 Tbs sugar
1 1/2 tsp salt
1 Tbs coconut oil, melted (vegetable oil works too)
2 tsp instant yeast
1-1/4- 1-1/2 cups of warm water.

Make Them

Mix the yeast and water together and set aside. Once all of the other ingredients are mixed, add the water and yeast combination and mix well. I prefer to mix this type of dough with my hands.


Place the dough onto the counter and knead it until it is nice and smooth. This should take about 10 minutes.


Separate the dough into 8 equal sized portions and roll them into balls. Allow them to sit for about 20 minutes. Pre-heat your oven to 425 degrees F.


Check out this video on rolling bagels. I'm pretty sure I didn't look like this when I shaped my bagels, but the more you do it, the easier it gets. Maybe one day I will be this efficient.

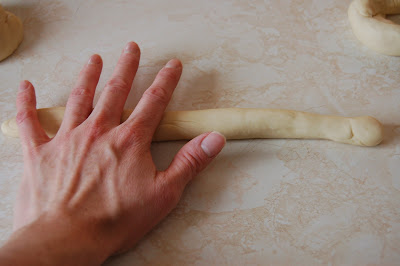
Roll out each ball into a snake-like line.

Wrap the dough around your hand and give it a roll to create a circle.
Let your bagels rest on the counter for about 20 minutes.
Meanwhile, bring a pot of water to boil. Once your bagels have sat for 20 minutes, and the water in the pot is boiling, it's time to boil your bagels. This is the step I had no idea existed when it came to making bagels. From what I have read, boiling bagels allows the crust to be thicker and chewier therefore, the longer you boil them, the thicker and chewier they'll be. Generally, you should boil your bagels for 30-60 seconds each side.

So, place the bagels into the boiling water, wait about a minute, flip them and wait another minute before taking them out.


Once the bagels are boiled, slightly dry them and then place them on an oiled cookie sheet. I used coconut oil, but vegetable oil would work too.

You can top your bagels with whatever toppings you'd like. I used sesame seeds on half of mine but you can also used chopped onion, poppy seeds or whatever else you can think up. I think next time I will add more toppings. I found many of them fell off in the baking process.

Place the cookie sheet in the oven, and after 8-10 minutes, flip the bagels over, bake for another 8-10 minutes. That's it, they're done!


Let them cool for about 20 minutes and then enjoy.
Try making some homemade cream cheese to spread on these chewy bagels.
Recipe originally found at Homemade Bagels.

Friday, 15 February 2013

Cream Cheese

Why not?
Why not make your own cream cheese?
How hard can it be?
As it turns out, it isn't hard at all. All you need is whipping cream and lemon juice. What?
Try it now. You will not be disappointed.

What you'll need

2 cups whipping cream
1 tablespoon fresh lemon juice

Make It

Line a strainer with cheese cloth. Set the strainer over a bowl and set aside.


Make sure you have 3-4 layers of cheesecloth.


Heat the cream to 190 degrees F, over medium heat. Stir constantly.


Add the lemon juice and continue stirring.


The cream will eventually thicken up and should cover the back of a wooden spoon like in the above picture.  Remove the pot from the burner and let it cool for about 25 minutes.


Pour the cooled cream into the strainer, cover the bowl with plastic wrap and place it in the refrigerator. Leave it in the fridge for about 8-10 hours or over night. Discard the liquid in the bottom of the bowl. Place the drained cream cheese into an airtight container and keep it in the fridge.


Now spread your cream cheese on a bagel and enjoy.